Solidworks Projected Sketch on Sketch

Step by Step make a Projected Sketch on Sketch

1. Create a sketch using the two pieces of the plane perpendicular to each other

    Create as an example in figure 1a & 1b

2. Select the menu Projected (Insert ==> Curve ==> Projected)

3. Select the type Projection Sketch on Sketch, select sketch 1a and 1b on the box
sketch choice. Select OK (green check mark)

4. The result will look like the figure 4

5. If we use to sweep the result will look just as figure 5


You can project a sketched curve onto a model face to create a 3D curve. You can also create a 3D curve that represents the intersection of two extruded surfaces generated by creating sketches on two intersecting planes. You can preselect items before you click Project Curve . If you preselect items, SolidWorks attempts to select the appropriate type of projection . You can right-click in the graphics area and select a projection type from the
shortcut menu. When you have selected enough entities to create a projected curve, the OK pointer appears. Right-click to create the projected curve. To project a curve: Click Project Curve on the Curves toolbar, or Insert, Curve, Projected. The Projected Curve PropertyManager appears. Under Selections, set Projection Type to one of the following: Sketch on Faces Sketch on Sketch A preview of the projected curve appears. Click OK to create the projected curve, or Cancel to cancel the transaction.

Comments Off

Delete Face Fill Tangen Solidworks Tutorial

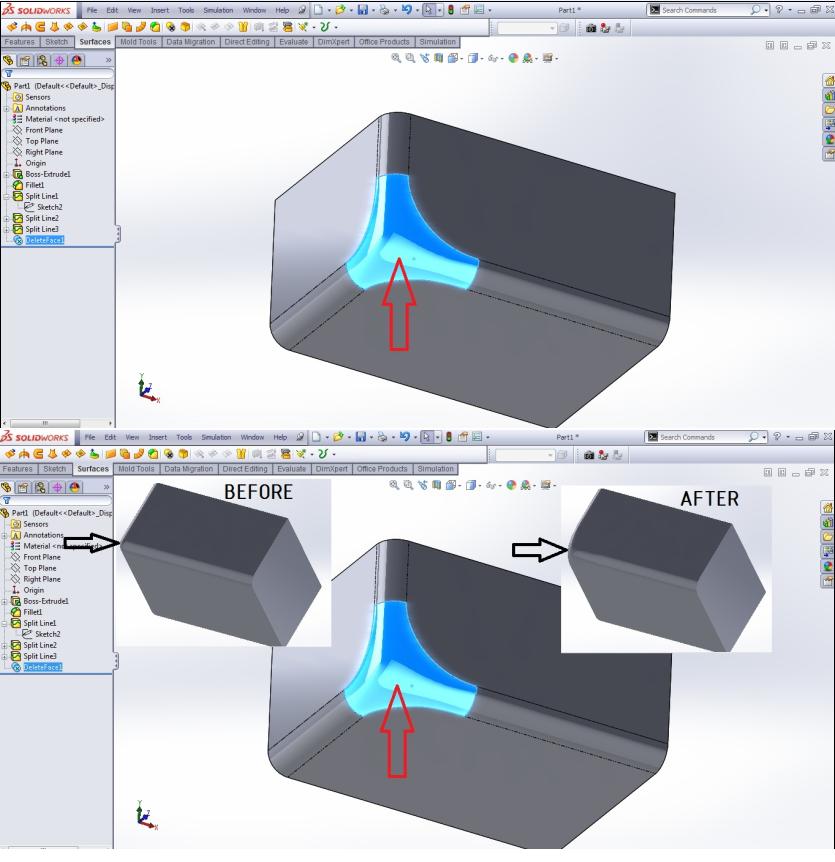
Tutorial Delete Face - Fill Tangen Solidworks
1. Open the file with a face that has been split, select the delete face
2. Fill Selection with a face like a picture, on select Delete an Option
fill and check tangent fill selection
3. Click OK
4. The result can be seen from the pictures before and after the process delete face.
Delete Face Deletes a face from a surface body, or deletes one or more faces from a solid body to create surfaces...Deletes a face from a surface body or solid body and automatically patches and trims the body...Deletes faces and generates a single face to close any gap Parts and Features > Features Mid Surface You can either add new face pairs, delete existing ones, or update face pairs...Select a set in Face Pairs and press Delete Parts and Features > Features Recognizing Features Interactively If you want to delete one or more faces, click Delete Faces...If you delete faces that are necessary for previously recognized features, FeatureWorks will not be able to recreate those features Parts and Features > Features Choose Option From the Delete Face PropertyManager, you can select one or more faces on the solid model to create surfaces Import Diagnostics PropertyManager If a face has too many faults to repair, you can delete the face and insert a new face in the gap Import and Export > Import Diagnostics Overview Mold Design Tools Overview Deletes a face from a surface body or solid body and automatically patches and trims the body...Deletes faces and generates a single face to close any gap Mold Design|SOLIDWORKS Fundamentals > Industry-specific Design Tools|Mold Design Tools Overview Tool and Die Design Tools Overview Deletes a face from a surface body, or deletes one or more faces from a solid body to create surfaces...Deletes a face from a surface body or solid body and automatically patches and trims the body...Deletes faces and generates a single face to close any gap SOLIDWORKS Fundamentals > Industry-specific Design Tools Delete Faces Example The following illustrates a good use of Delete Faces...Delete the filleted faces, then recognize the rest of the features in the model...If you delete faces that are necessary for previously recognized features, FeatureWorks will not be able to recreate those features Parts and Features > Features Hints for Interactive Feature Recognition Use Delete Face(s) to remove complex or unwanted faces...If you delete faces that are necessary for previously recognized features, FeatureWorks will not be able to recreate those features Parts and Features > Features Extruding Surfaces from a 2D or 3D Face To remove the faces defining the extrude from the model after extruding, click Delete original faces...The resulting model is hollow where the face was deleted Parts and Features > Features.

Comments Off

AutoCAD Modifications Element Color

The default screen color background for Model Space is Black. The default screen color background for Paper Space is White (simulating a sheet of paper). This is your best indicator of what space you are working in.
For added convenience for users, AutoCAD also provide a variety of options for displaying colors on
elements of the worksheet. For more details, follow these steps.
1. Type op (OPTION) on the command line.
2. Click the Display tab view Area Window Elements.
3. Then click Colors, Drawing dialog box appears Windows Colors.
4. Select the element you want to change the color on the menu Interface element.
5. For example, click the crosshairs element.
6. In the drop down menu, Color: can be transformed into a red color.

Comments Off

CIRCULAR ARRAY 3D Solidworks

Array is a repeating pattern of the selected features. we can create a linear pattern, a circular pattern, a pattern driven curve, fill patterns, or use sketch points or coordinate tables to create a pattern. We can choose the option Visual Properties in the Property Manager. With parts of the multi-body, you can use a pattern or a pattern or feature mirror to mirror some of the bodies in the same document. For Linear pattern, select the feature, then specify the direction, linear distance, and the total number of cases. For Pattern Circular, select the features and benefits as the center or axis of rotation, then specify: The number of cases and the total angle at which to create the pattern. For Curve Driven Pattern, select the features and advantages or segments sketch to pattern features. Then you can determine the type of curve, curve method, and the method of alignment. For Patterns Sketch, choose where to fill the superior features by sketching points on the model's face. For Table pattern, add or retrieve previously made X-Y coordinates for the filling of excellent features on the model's face. For Pattern Fill, fill the area defined by a pattern or cut features defined configurations. For Mirror Features, select a feature to copy and planes around which to mirror them. If you choose a planar face on the model, you mirror the entire model of the selected face. 
1. Draw a line to the reference axis
2. Make a feature that will be in the array, make an example extrude cut like
on picture
3. Select the Array ==> Circullar
4. Fill the parameters axis by axis sketch that has been made - Fill in the amount of features we wanted - click Equal spacing (if we wanted the same distance) - Select a feature that will be in the array (extruded cut has been made) - OK (click the check the color green).

Comments Off
Powered by Blogger.